A full back tattoo is where big ideas finally have room to breathe. You can tell a story, build a powerful symbol, or create a design that flows with your shoulders and waist. It’s also easy to hide under everyday clothes, which makes it a smart choice if you want bold art without showing it at work. The key is planning it like a project. Pick a strong centerpiece, decide what areas you’ll finish first, and leave space for future sessions. Below are epic full back ideas with practical, budget-friendly tips so you can start confidently and build a piece that looks intentional from the first session.
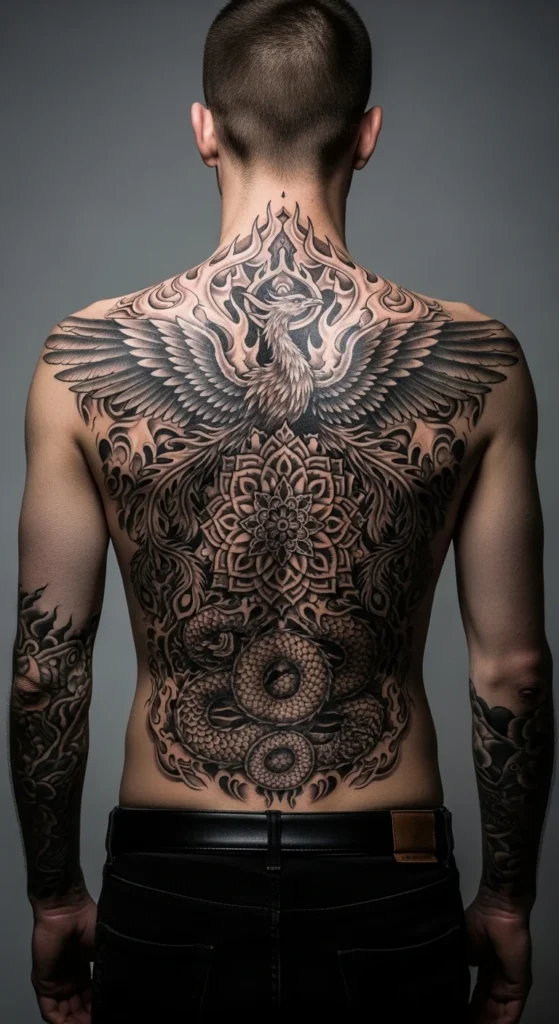
1. Phoenix Rising With Flame Wings
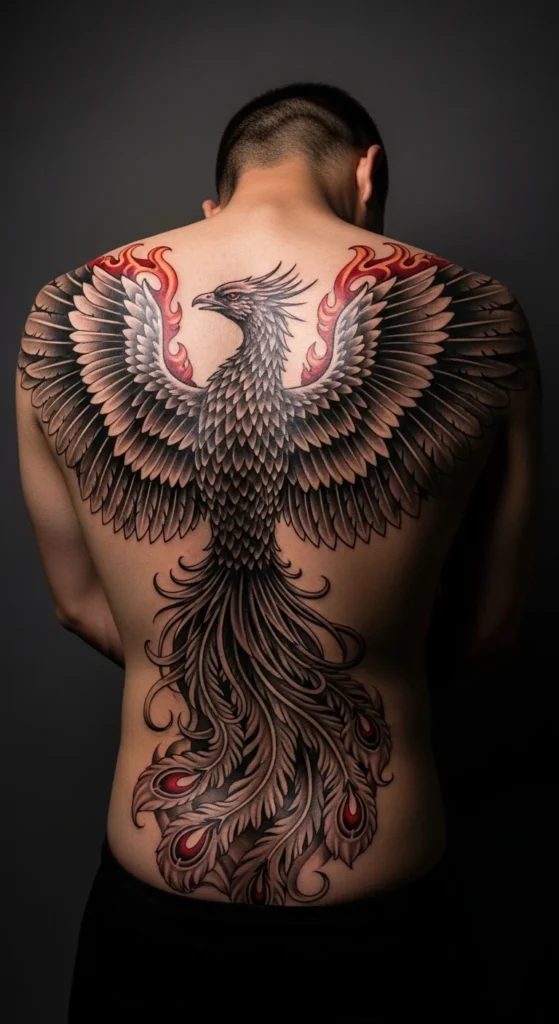
A phoenix back piece looks powerful because it uses the whole canvas. Wings spread across the shoulders, and the tail flames can run down the spine.
If you want to manage cost, start with the phoenix head and upper wings first. That gives you a complete “hero” section right away. Add the lower flames later.
Keep the flames simple at first. Big flame shapes read well and take less time than tiny flickers.
Budget tip: do black-and-gray first. Add small color accents later where you want attention, like the chest or wing edges.
DIY planning: print a back outline and sketch where the wings should end. Wider wings make shoulders look broader.
This design also ages well because bold contrast keeps it readable.
2. Mandala Universe Centered on the Spine
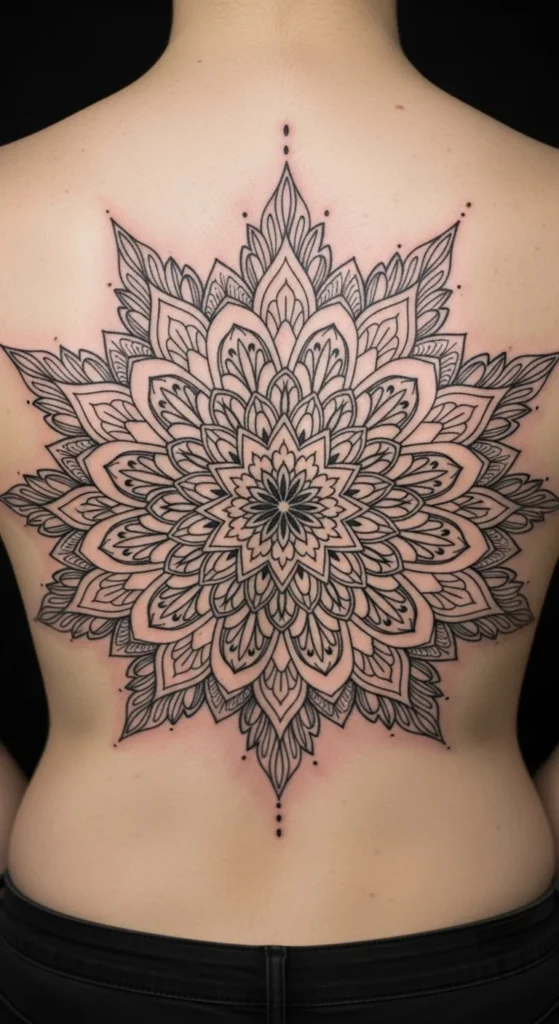
A giant mandala feels calm but still looks epic because of the scale. It sits perfectly on the back’s natural symmetry.
Start with the center circle first. Then expand outward in rings over multiple sessions. Each ring feels like progress.
Budget tip: linework-first sessions are cheaper. Shading and dotwork can be added later.
DIY idea: use a washable marker to draw a circle on the mid-back area and take a photo. It helps you pick the right size.
Keep lines slightly thicker than you think. Thin micro-lines can blur over time.
A clean mandala looks finished even if you pause between sessions.
3. Dragon Wrapped With Red Flowers
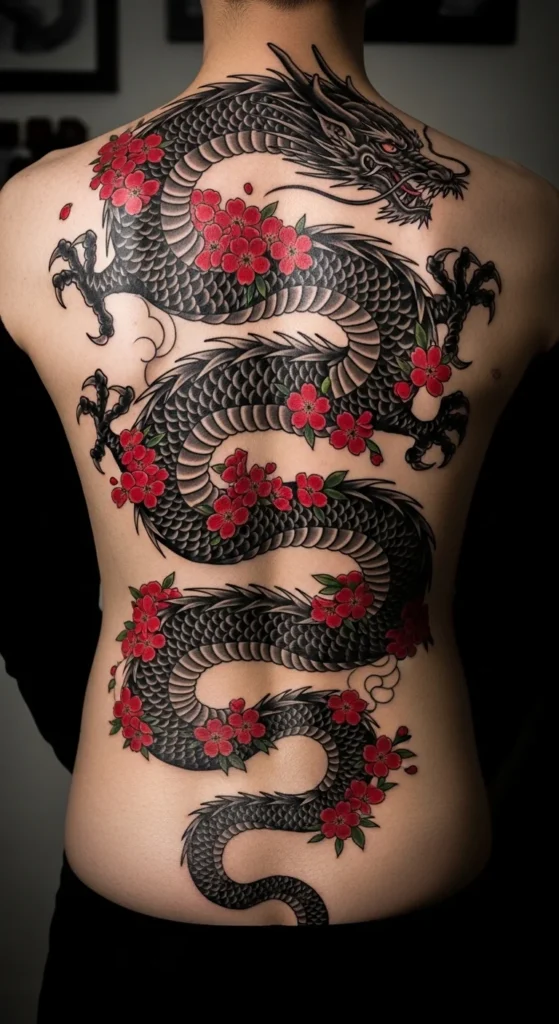
A dragon brings power. Flowers add balance. Together, it feels fierce and artistic.
To save money, start with the dragon head and one coil section. Add the rest of the body later.
Pick one flower type only. Consistent petals make it look planned and keep design time down.
Use black-and-gray for the dragon. Add color only in the flowers. This keeps the piece bold without paying for full color everywhere.
DIY planning: collect 3 reference photos max. One for dragon style, one for flower style, one for background.
This piece flows best when the dragon curves diagonally, not straight down.
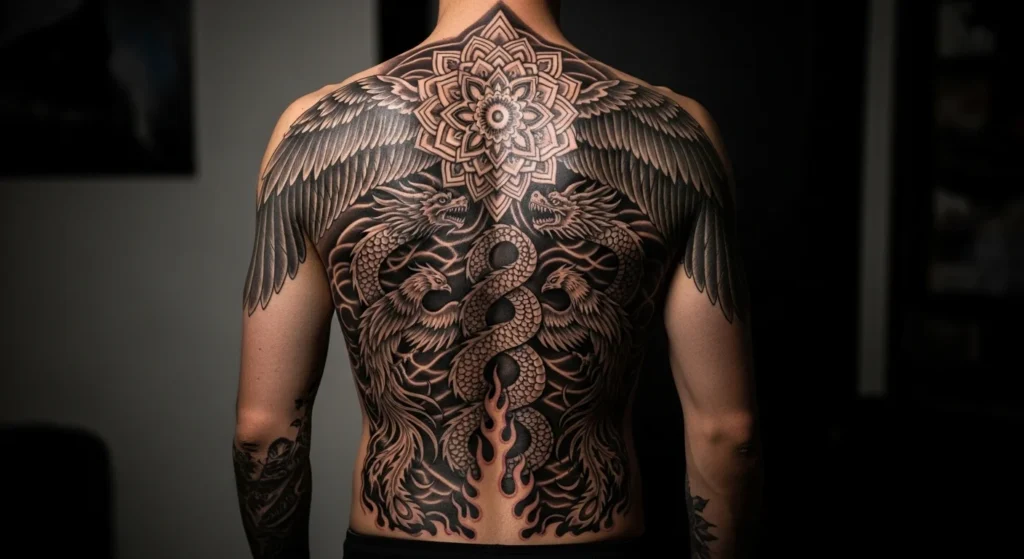
4. Industrial Biomechanical Full Back Armor
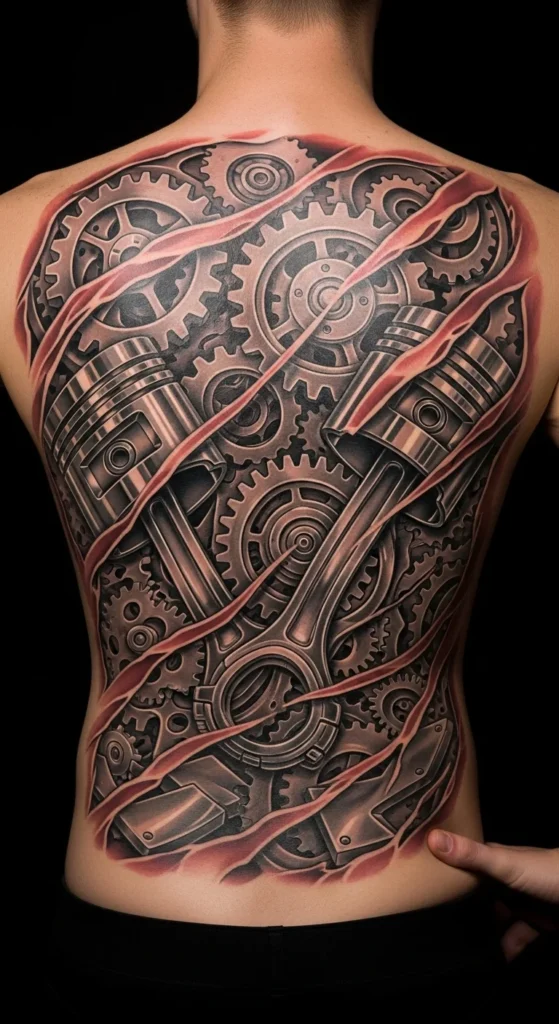
Biomechanical tattoos look epic because they create the illusion of depth. The back’s flat areas help the 3D effect pop.
Start with one shoulder blade “machine cluster.” Expand across the back with connecting pipes later.
Budget tip: choose big gears and clean shadows. Tiny wires take hours and cost more.
DIY idea: decide your metal style early—smooth steel, rough iron, or brushed metal. Consistency makes everything look unified.
Keep torn-skin edges only in a few areas. Too many rips can look busy.
This design looks best with high contrast, so don’t be afraid of darker shadows.
5. Eagle Wingspan Across the Shoulders

An eagle wingspan feels bold because it’s wide. It makes your upper body look broader and stronger.
Start with the eagle head and upper wings first. Then add feather layers later.
To control costs, ask for medium feather detail. You don’t need every tiny strand to make it look real.
DIY planning: measure shoulder width and mark where you want the wing tips to stop. This prevents wings from looking too small.
Black-and-gray works great here. You can add subtle brown tones later if you want warmth.
This is a strong choice if you want a piece that reads clearly from far away.
6. Wyvern Gripping a Coiled Snake
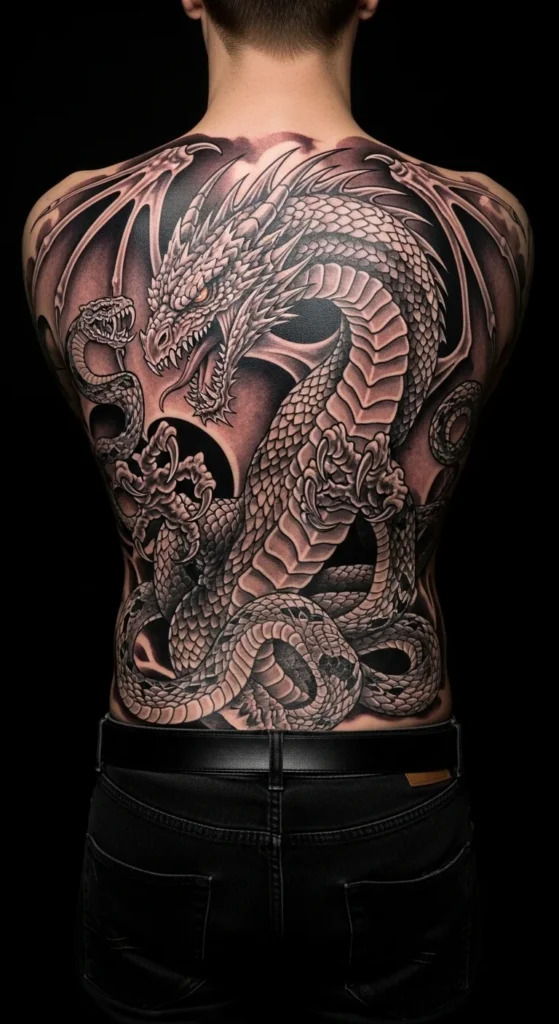
A wyvern feels wild and mythical. Adding a snake makes it look like a full story scene.
Start with the wyvern head and claws. Those are the attention points.
Keep the snake body simple at first. Add scales later if you want more detail.
Budget tip: use strong outlines and big shadow areas. This saves time and keeps the design readable.
DIY idea: pick one direction for movement. Diagonal up-left or up-right looks more dynamic than straight down.
This piece looks best when the wings fill the shoulder area and the snake runs toward the lower back.
7. Lion and Butterfly Transformation Scene
Lion plus butterfly is a cool “strength meets growth” theme. It looks epic because it blends two moods in one design.
Start with the lion face first. That’s the anchor. Add butterflies later as a softer fade-out.
Budget tip: keep butterflies simple silhouettes at first. Add wing detail later.
DIY planning: decide where you want the blend to happen—upper back or mid-back. Upper back reads stronger.
If you want color, use it only in the butterflies. It’s cheaper than coloring the lion.
This design also looks good even if you pause after finishing the lion.
8. Cheetah Sprint With Sunburst Motion
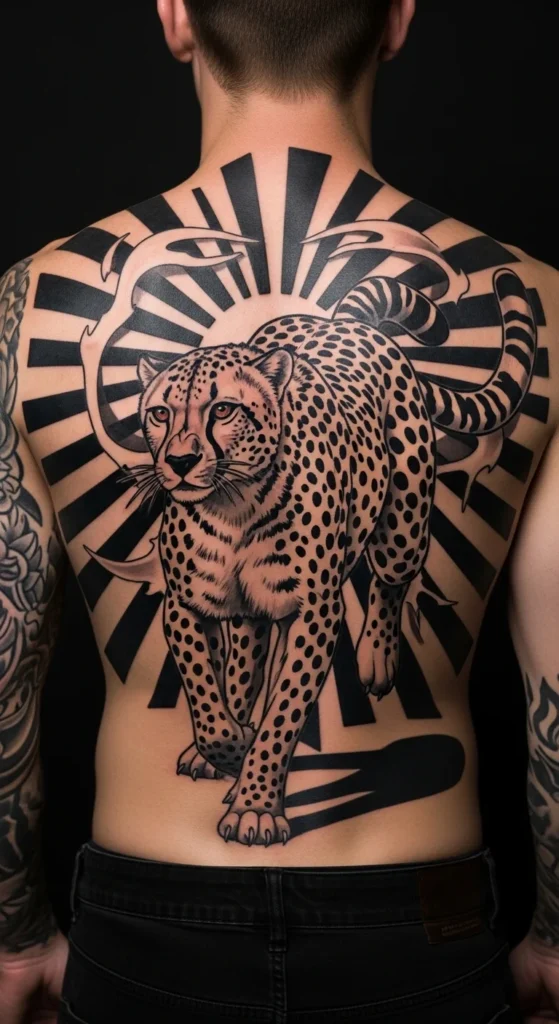
A cheetah feels fast and sharp. Sunburst rays add energy and fill space.
Start with the cheetah outline and face. Add motion rays later.
Budget tip: keep the background as clean rays instead of full scenery. It fills space without costing a lot.
DIY idea: choose a pose that stretches across the back diagonally. It makes the body look longer.
Black ink with a few warm highlights can be enough.
This is great if you want a design that looks alive.
9. Filigree Back Palace in Blackwork
Filigree designs look fancy because they’re structured and symmetrical. They also work well as step-by-step builds.
Start with the center spine flourish first. Add side curls later.
Budget tip: keep it linework-heavy. Avoid full shading everywhere.
DIY planning: print a back outline and draw where you want the “frame” to sit. Framing helps it look intentional.
This style pairs well with small gems or dotwork accents later.
It’s bold without looking heavy.
10. Henna-Inspired Half Mandala Expansion
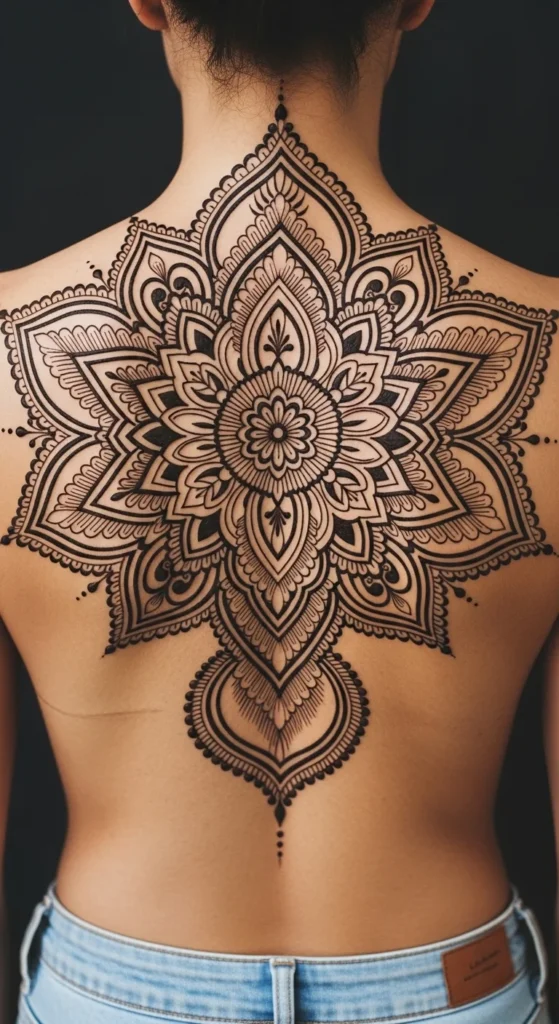
A half-back mandala feels cultural and artistic. It’s also cheaper than a full symmetrical piece.
Start with the main half-mandala near the spine. Expand outward later if you want more coverage.
Budget tip: do linework first. Add dot shading only in key spots.
DIY idea: decide if you want it on the left or right side based on how you pose in photos.
This design looks finished even when it’s only half coverage.
11. Spider Lily Full Back Bloom Scene
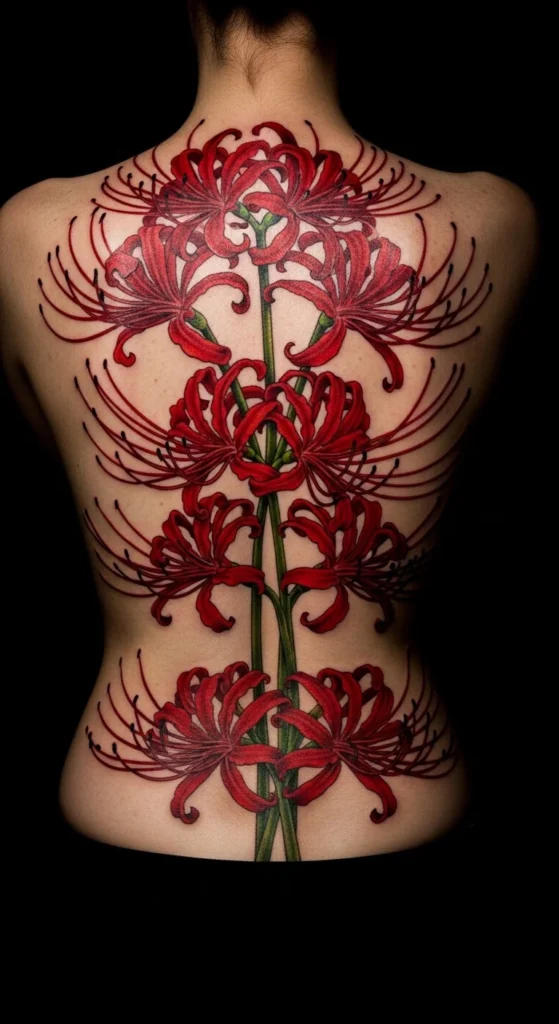
Spider lilies look emotional and bold. Big petals make them readable from far away.
Start with one main bloom in the center. Add side blooms later.
Budget tip: keep stems simple and focus detail in petals only.
DIY planning: decide how much red you want. Using red only on petals keeps costs lower than full color shading everywhere.
This is a strong choice if you like floral designs that still feel intense.
12. Cherry Blossom Wave Across the Back

Cherry blossoms look epic when they cover the whole back like a drifting storm of petals.
Start with a main branch line first. Add blossoms in later sessions.
Budget tip: outline blossoms first, then color later.
DIY idea: plan negative space so the design doesn’t look crowded.
Soft petals look great with minimal shading.
13. Angel Wing Guardian Backpiece
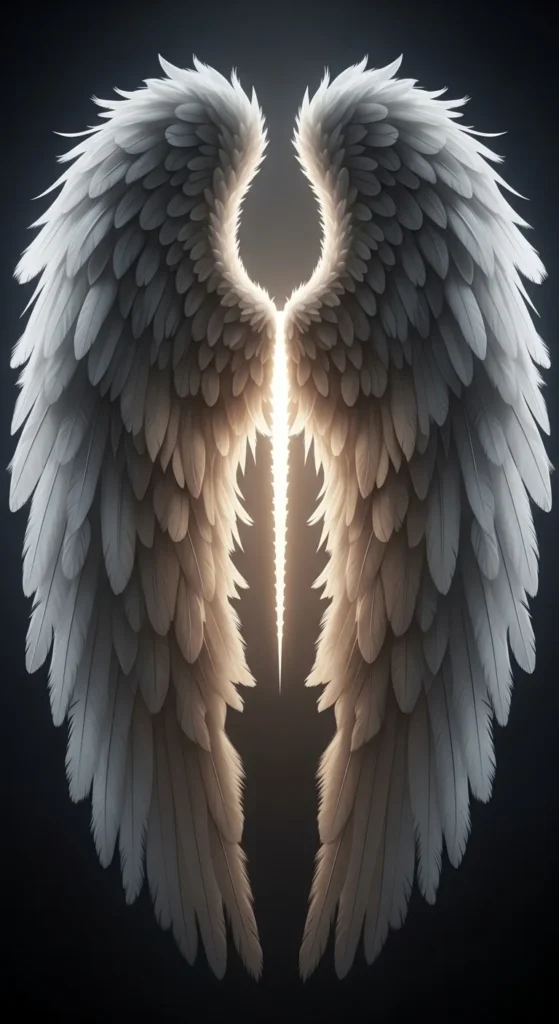
Full wings look huge and powerful, and they’re easy to build in steps.
Start with the wing bases near the shoulder blades. Add feather rows later.
Budget tip: choose medium feather detail. Too much tiny feather work adds hours.
DIY planning: measure where you want the wing tips to stop. Wider wings look more dramatic.
This style hides well under shirts, but looks massive when revealed.
14. Patchwork Story Back With Icons and Animals
Patchwork can look epic when it’s planned like a mural. The trick is making it cohesive.
Start with one centerpiece icon. Then add 2–3 supporting elements around it.
Budget tip: stick to one style. All black-and-gray or all fine-line, not mixed.
DIY idea: create a simple “theme list” on paper: 5 symbols, 2 animals, 1 flower. Bring it to your artist.
Leave space between elements so it doesn’t look crowded.
This is perfect if you want a back piece that grows over years.
15. Cowboy Western Back Saga
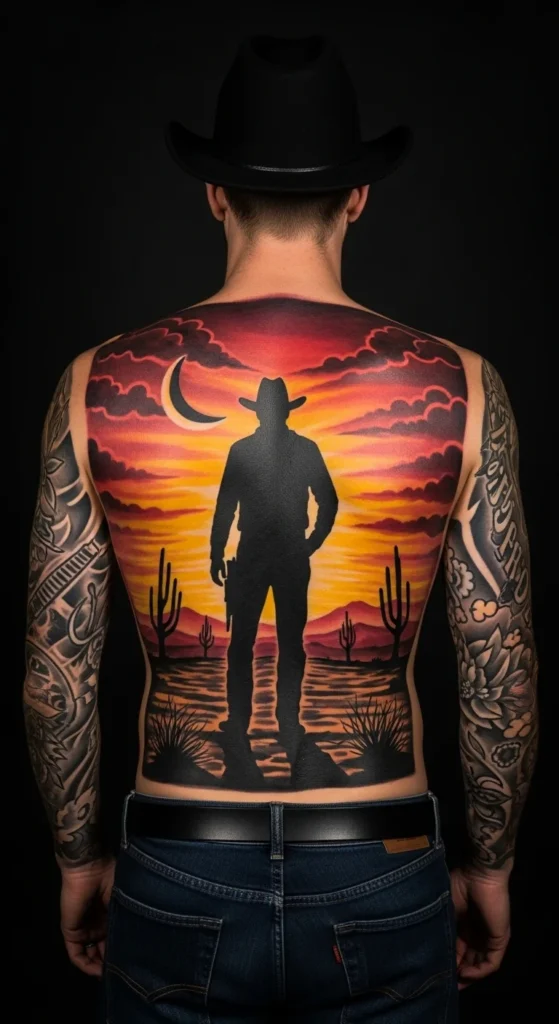
Western themes feel rugged and bold. Think cowboy silhouette, desert sky, and horses.
Start with the main cowboy figure first. Add scenery later.
Budget tip: use silhouettes instead of full realism. It’s faster and still strong.
DIY planning: pick one “main scene” moment. Don’t try to add too many elements at once.
This can be black ink only and still look big.
16. Mechanical Full Back Machine Panels
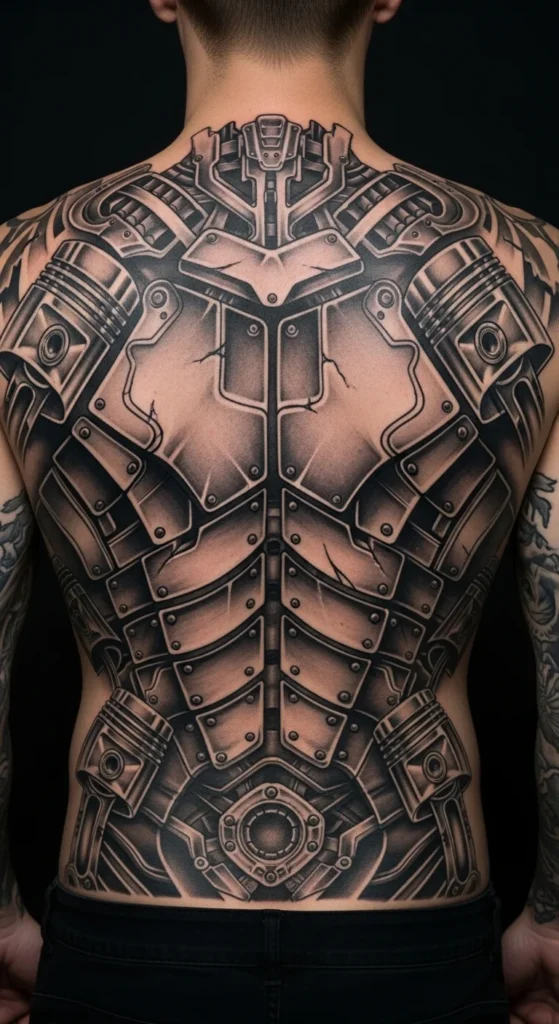
Machine panel tattoos look like armor. They fill space cleanly.
Start with upper panels first. Add lower panels later.
Budget tip: use big plates and fewer tiny rivets.
DIY idea: decide where panels “open” near shoulder blades for a dramatic reveal.
Bold shading makes it look real.
17. Dragon and Peony Garden Backpiece

A dragon with peonies feels strong and classic. Flowers soften it without making it weak.
Start with dragon head and one flower cluster.
Budget tip: add color only to peonies later. Keep dragon black-and-gray.
DIY planning: keep petals bigger than you think. Small petals blur faster.
This design fills space beautifully.
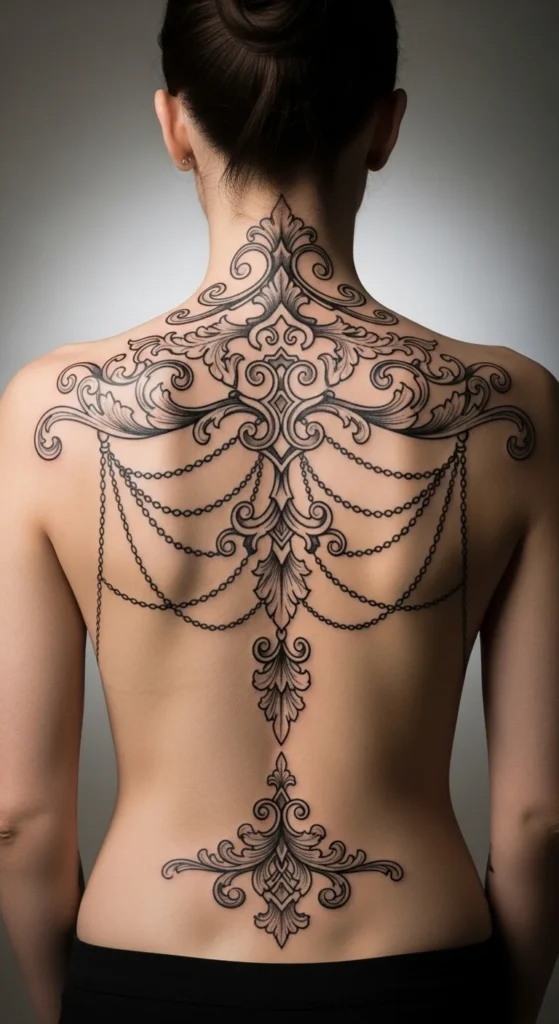
18. Full Back Ornamental Chains and Beads
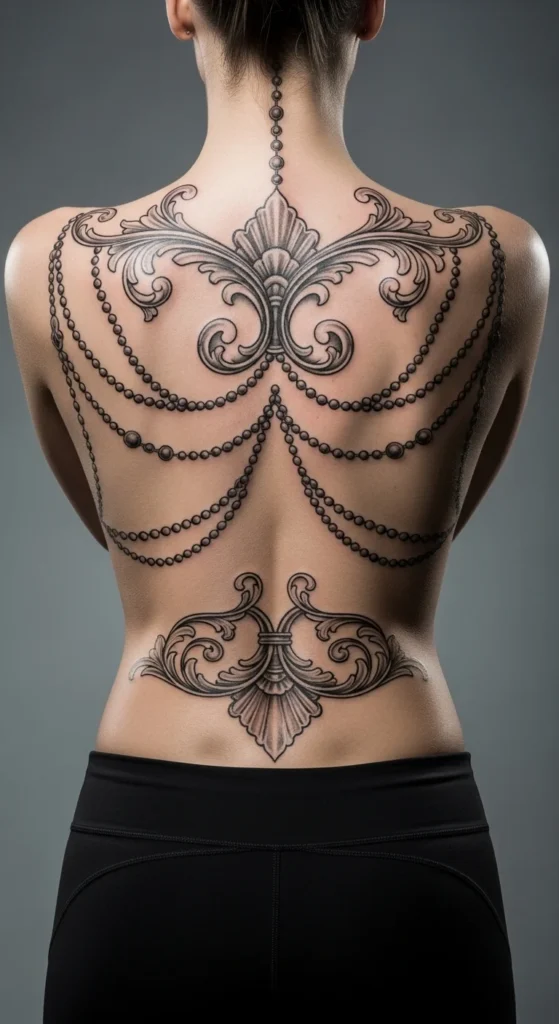
Bead-chain ornamentation looks like jewelry across the back.
Start with the center spine drop first. Add side chains later.
Budget tip: linework only looks great and saves time.
DIY idea: sketch where the “drape” should hang so it fits your shoulder slope.
This style looks classy and bold.
19. Quote Spine With Lotus Anchors
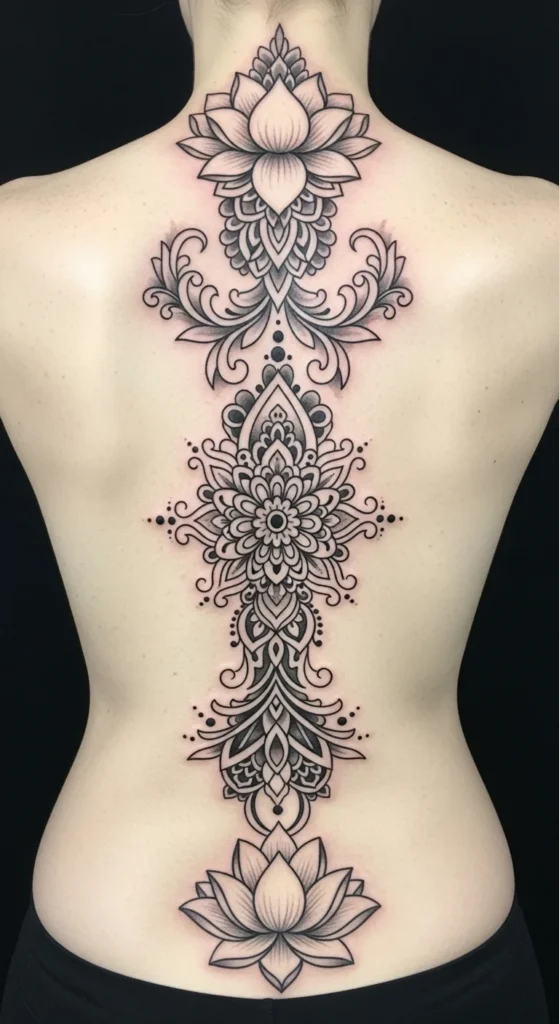
A spine quote design is personal and dramatic. Lotus anchors make it look structured.
If you’re budgeting, start with the lotus anchors first. Add the text later.
Keep lettering larger. Tiny lettering can blur.
DIY planning: print the quote in the font you want and measure how it fits the spine.
This is a slow-build design that still looks good early.
20. Giant Mandala With Floral Corners
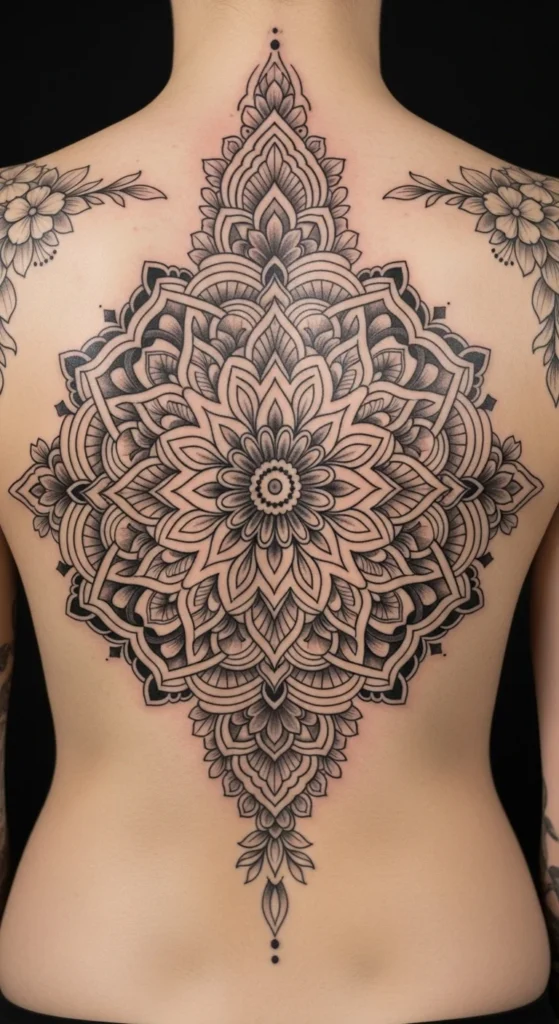
Mandala plus florals gives structure and softness.
Start with mandala center. Add florals in corners later.
Budget tip: linework first, shading later.
DIY idea: decide if you want the florals on shoulders or lower back corners.
This looks complete even in stages.
21. Mythic Beast Trio Mural
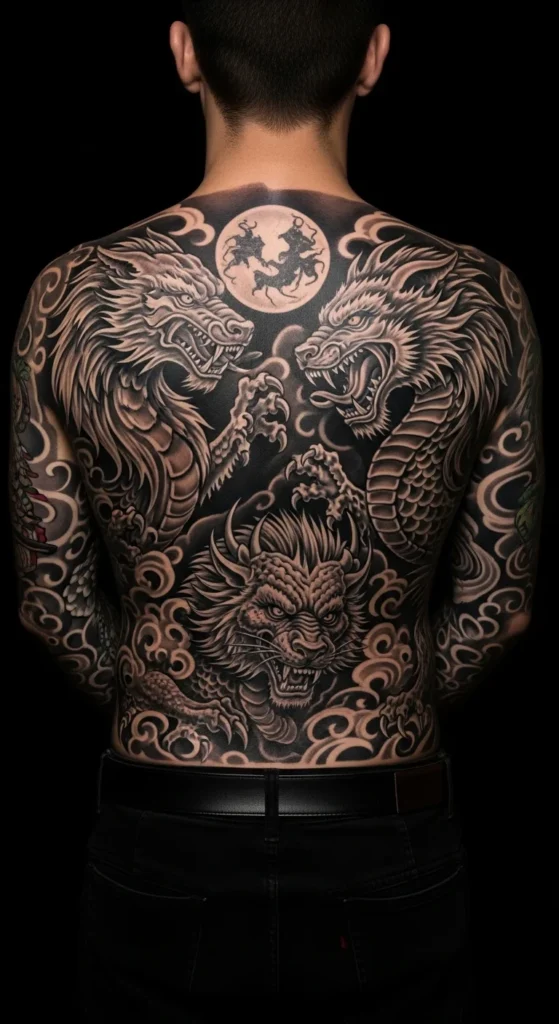
A beast trio mural looks huge because it fills the full width.
Start with the center beast first.
Add side beasts later.
Budget tip: keep backgrounds minimal and use smoke or clouds to connect elements.
DIY planning: choose one art style and stick to it.
22. Fine-Line Floral Meadow Full Back
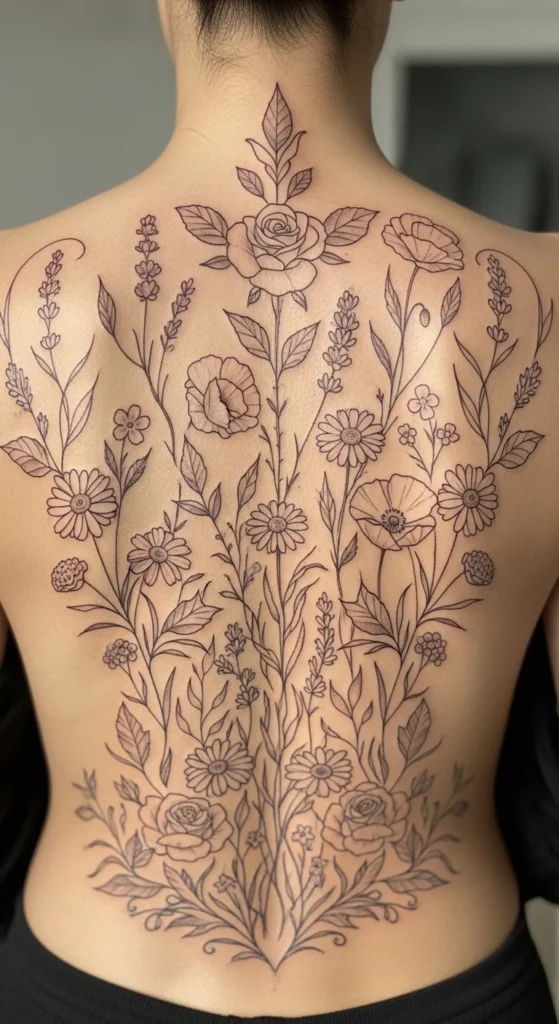
A floral meadow can look epic when it covers the entire back lightly.
Start with big flowers first. Add small filler flowers later.
Budget tip: fine-line outline first, shading later.
DIY idea: plan where your “main roses” go so the piece has clear focal points.
This is soft but still large-scale.
23. Full Back Wings With Mandala Core
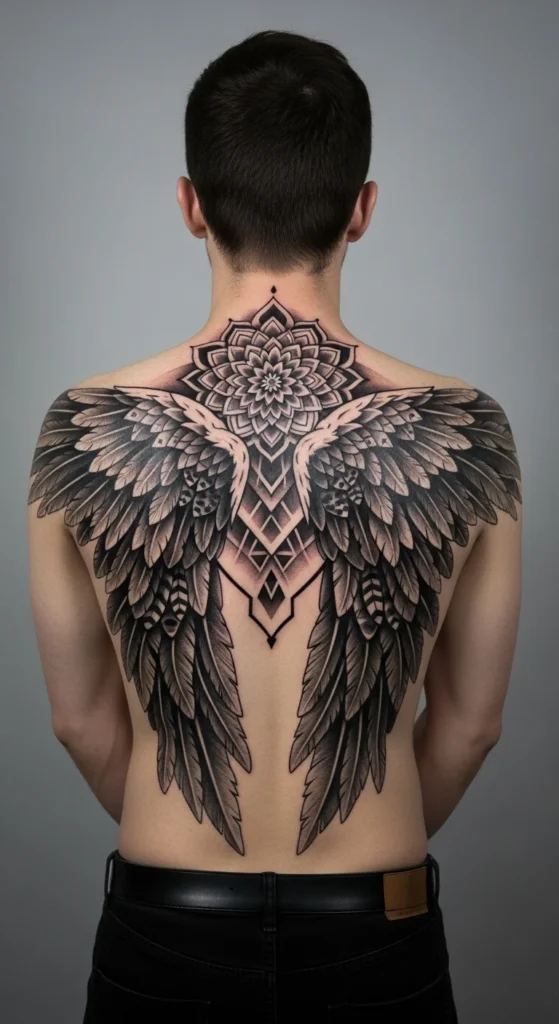
Wings plus a mandala center looks huge and structured.
Start with the mandala core first. Then add wing bases.
Budget tip: feather detail can be medium. The mandala will carry the “detail” feel.
DIY planning: decide wing tip length early so it doesn’t look short.
This is a great “epic” design because it combines width and symmetry.
Conclusion
A full back tattoo works best when you plan it like a build. Pick one strong centerpiece, map the flow across shoulders and spine, and break the project into stages that fit your budget and pain tolerance. Start with the parts that make the design readable early, then fill background and extras later. With clear references and smart pacing, you’ll end up with an epic back piece that looks cohesive and powerful for years.