A back tattoo gives you the biggest space to go bold without having it on display all day. That’s why full back tattoos, upper back pieces, and spine designs stay popular for men who want powerful art with work-friendly coverage. The key is picking a design that matches your build, moves with your shoulders, and can be done in stages if you’re watching your budget. Below are strong ideas with practical tips so you can plan smart, keep sessions manageable, and build a back piece that looks intentional from day one.
1. Viking Warrior Full-Back Battle Scene
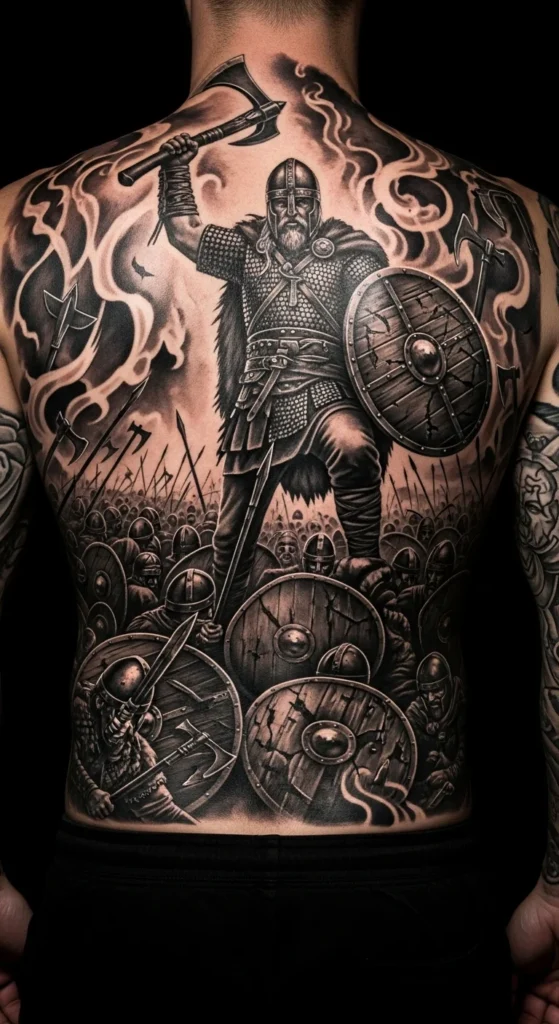
A Viking battle scene looks massive and fearless. It works best when the main warrior sits high between the shoulder blades so the face stays readable when you move.
To keep costs under control, start with the hero figure and the helmet details first. Skip the background at the start. Add ships, smoke, and banners later.
Choose black-and-gray for the first sessions. It’s faster than color and still hits hard. If you want color, add small accents like a red cloak later.
Budget tip: ask for a design with bold shapes. Tiny armor patterns take longer and cost more.
DIY prep: take photos of your back straight-on and slightly turned. Bring them to the consult so the artist can plan muscle flow.
This style hides easily under a shirt but looks huge at the beach.
2. Samurai Backpiece With Rising Smoke
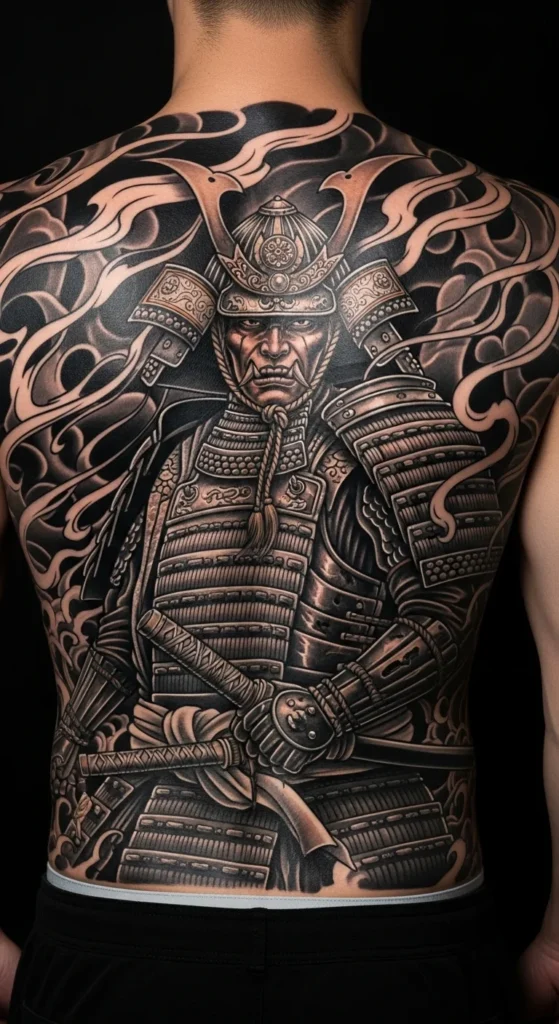
Samurai designs feel disciplined and powerful. The armor plates and smoke naturally fill space without looking messy.
Start with the mask and chest armor area first. That creates a strong center. Add smoke curls outward later.
Keep smoke shading soft. Heavy smoke takes time. Soft gradients still look bold.
If you’re saving money, skip a full background. Use negative space around the samurai so it reads clean.
DIY idea: pick one symbol you care about, like a simple crest shape. Add it later near the lower back to finish the story.
This piece looks best when the shoulders carry the outer motion lines. It makes you look wider.
3. Spartan Helmet With Shield Crest

A Spartan helmet is a clean upper-back statement. It’s bold without requiring a full back commitment.
Place the helmet high and centered. Add a shield or crest behind it for width.
To save money, use solid blacks and simple shading instead of hyper-realism. You’ll still get strong contrast.
DIY planning: print two versions—one simple, one detailed. Ask the artist which version saves the most time while keeping the look.
If you want to expand later, add spears that angle down toward the lats. It turns into a larger piece without starting over.
It’s a good first “big tattoo” because it can stand alone.
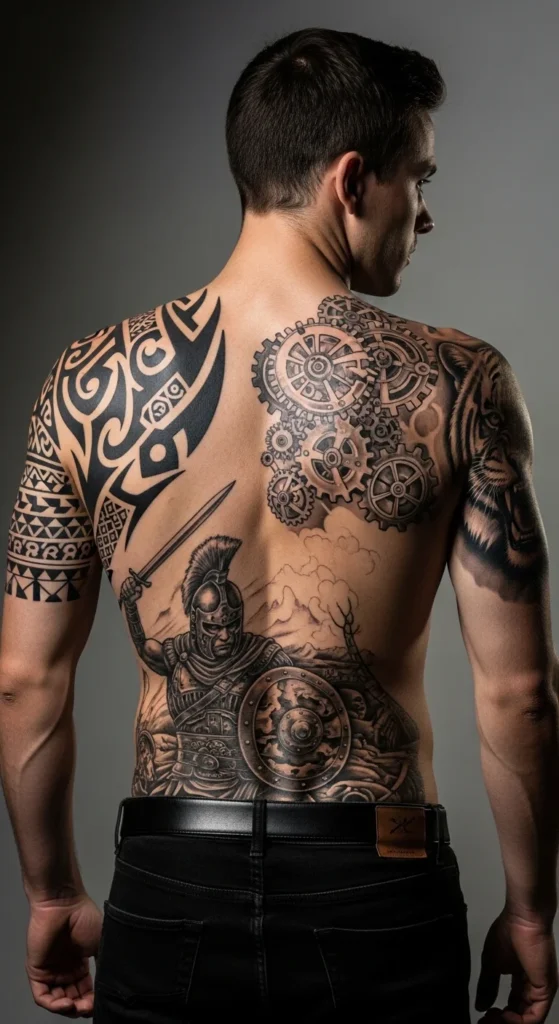
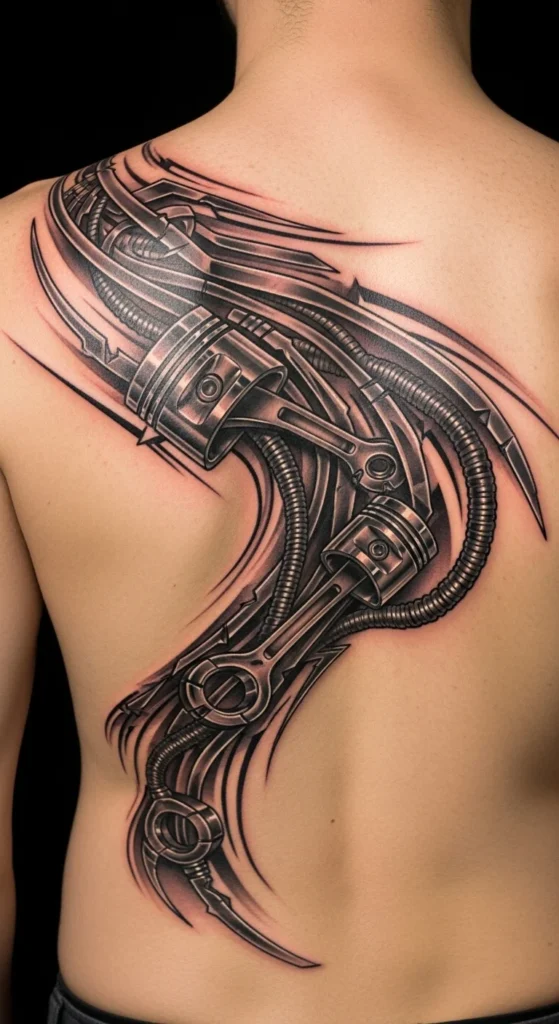
4. Biomechanical “Under Skin” Shoulder Reveal
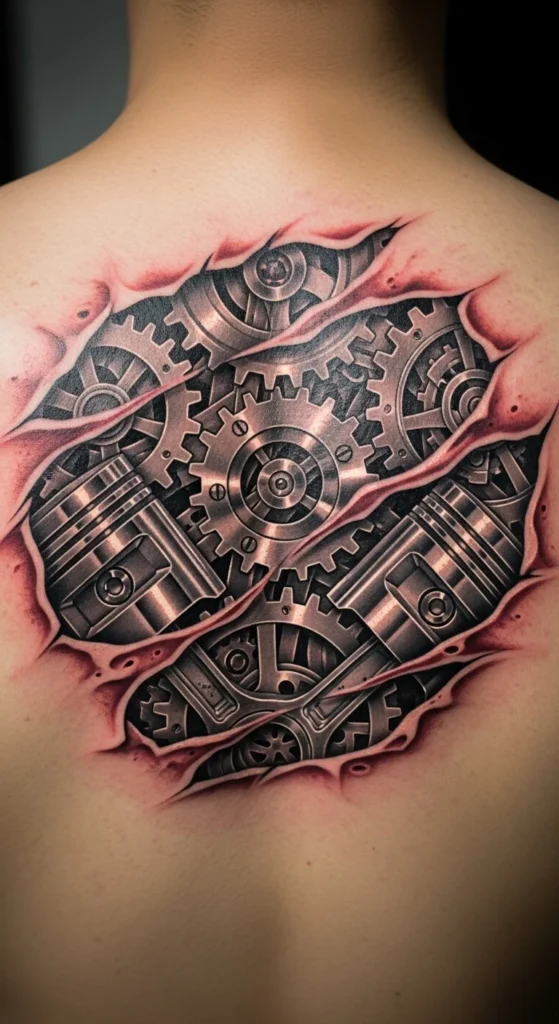
Biomechanical designs look like machinery under the skin. They’re perfect for the flat areas of the back because the 3D illusion reads clearly.
To manage cost, start with one gear cluster near one shoulder blade. Expand across the back later.
Skip tiny bolts and micro-wiring at first. Choose bigger gears and thicker shadows. It keeps session time shorter.
DIY budget move: decide your “metal type” look early. Pick one direction like brushed steel shading. Consistency saves redesign time.
Ask for torn-skin edges only in key spots. Too many ripped sections can make the design feel busy.
This style looks best with strong lighting contrast, so bold shading matters.
5. Cybernetic Spine Column
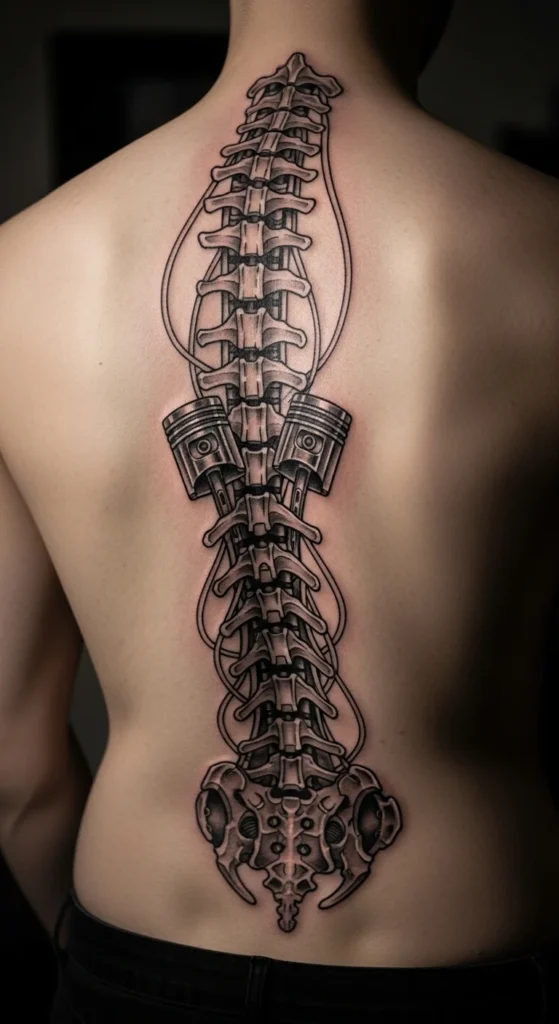
A cyber spine creates height and a futuristic vibe. It also works well as a modular tattoo.
Start with 5–7 segments in the middle. Add more segments up or down in later sessions.
Keep the design clean. Too much detail near the real spine can blur over time.
Budget tip: linework-first sessions are cheaper than full shading. Do the outline one day, shading another day.
DIY prep: mark your spine line with a washable marker at home and take a photo. This helps you visualize placement before the stencil.
It’s bold, readable, and easy to expand.
6. Wolf Pack Across the Shoulder Blades
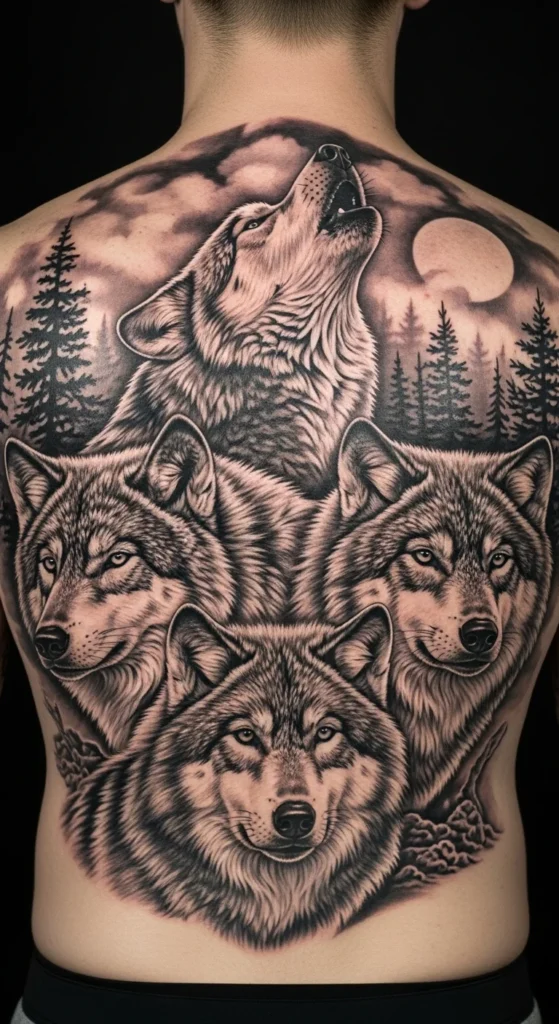
Wolves look aggressive and strong. A pack design spreads wide, which makes your upper back look bigger.
Start with one main wolf face in the center. Add side wolves later to build the pack.
To keep sessions shorter, use medium fur detail instead of tiny hair strokes everywhere. Strong contrast matters more than micro-detail.
DIY budget tip: choose a simple background like fog or mountains. Avoid full forests at first.
This design reads from far away. That’s what you want for a back piece.
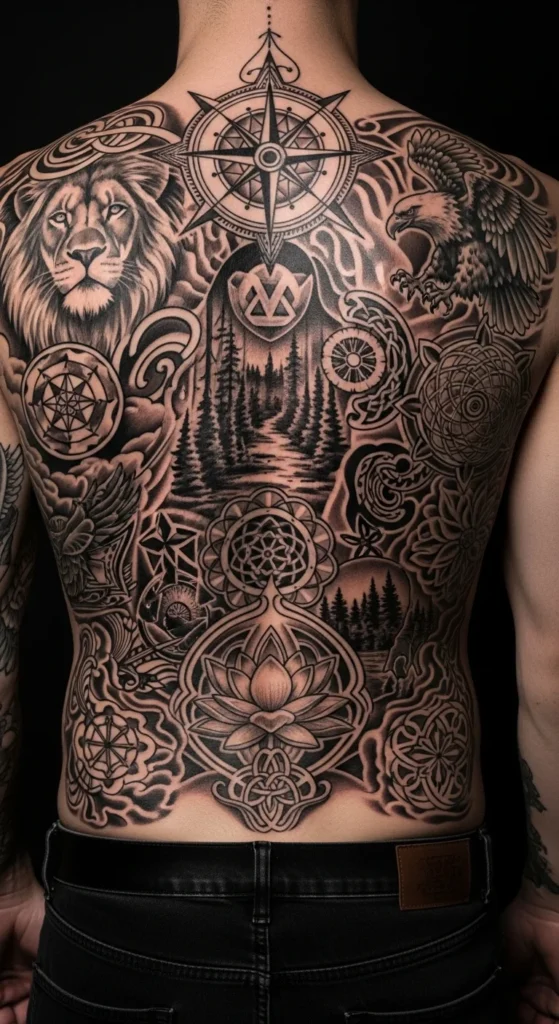
7. Roaring Lion Upper Back Portrait
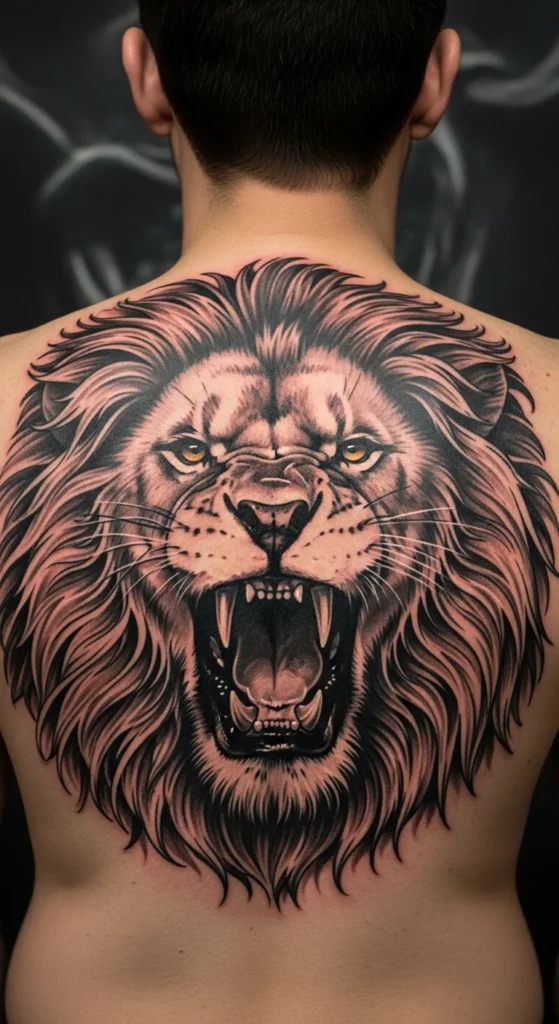
A lion portrait is a classic power move. Put it high between the shoulder blades so the eyes sit naturally.
If realism is too expensive, go for a semi-realistic style with bold shadows. It still looks strong.
Start with face outline and eyes first. Add mane shading later.
DIY planning: pick one main expression—calm stare or roar. Don’t mix both.
This one works as a stand-alone upper-back piece.
8. Bear Head With Mountain Backdrop
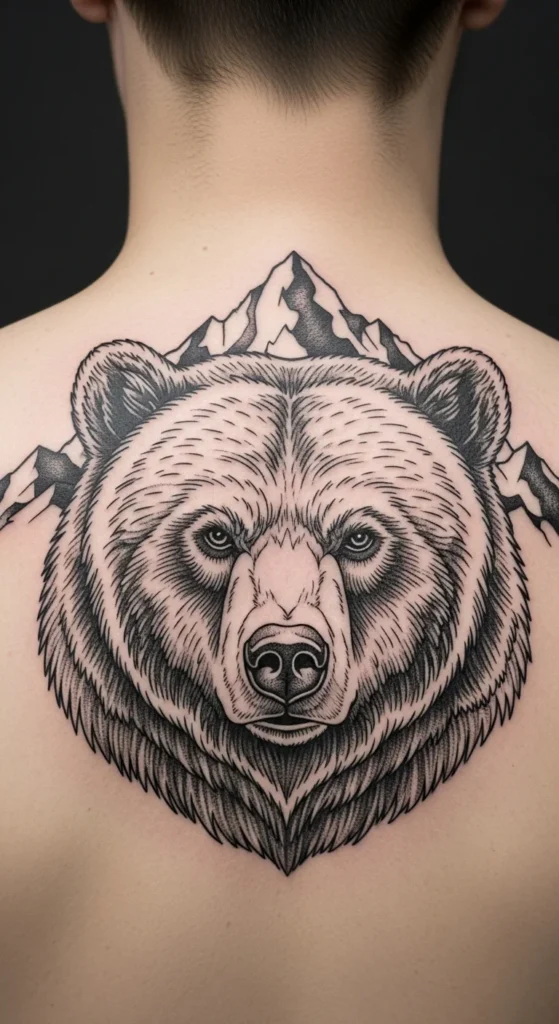
A bear feels heavy and grounded. Pairing it with mountains keeps the theme masculine and clean.
To save money, use a simple mountain silhouette instead of detailed scenery.
Start with the bear face first. Add the mountains later if you want a wider look.
Keep the fur shading simple. Big shadows are cheaper and still bold.
This design also hides easily under a collared shirt.
9. Tribal Shoulder Spread That Frames the Lats

Tribal patterns are built for muscle flow. They can make your V-taper look stronger if the lines angle down toward your waist.
Use thick black lines and clean spacing. It heals better and looks sharp longer.
Budget tip: tribal fills faster than realism. That can reduce total hours.
DIY prep: take a back photo and draw rough angles with a marker on a printed copy. It helps you see which direction makes you look wider.
You can add sections later without ruining the shape.
10. Tribal Sun Centered High Back
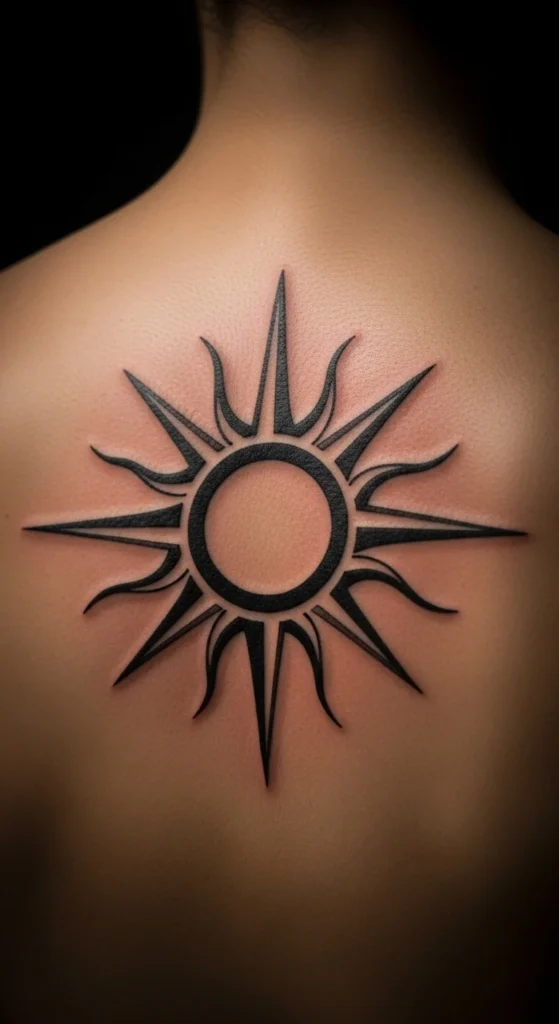
A tribal sun feels energetic and bold. It also works well as a single-session tattoo.
Keep rays thick and evenly spaced. Thin rays can fade quicker.
Start with the center disc and half the rays. Finish the remaining rays later if needed.
This tattoo stands out without covering your entire back.
11. Spine Totem Stack
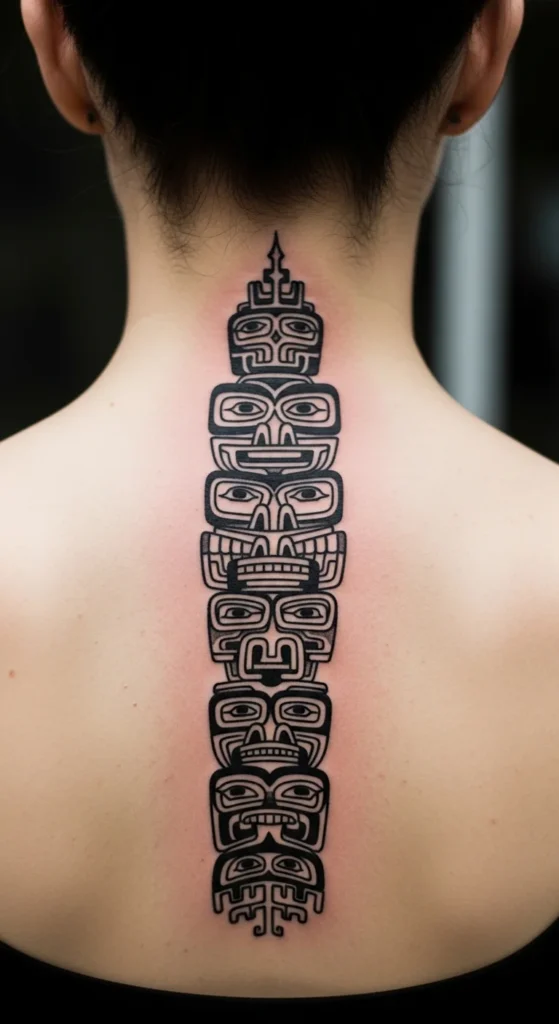
A spine totem looks tall and strong. It’s also easy to do in stages.
Start with 3 symbols in the middle. Add more later.
Stick to bold shapes. Tiny patterns cost more.
DIY move: write down what each symbol means to you. Give the list to your artist so the design feels personal.
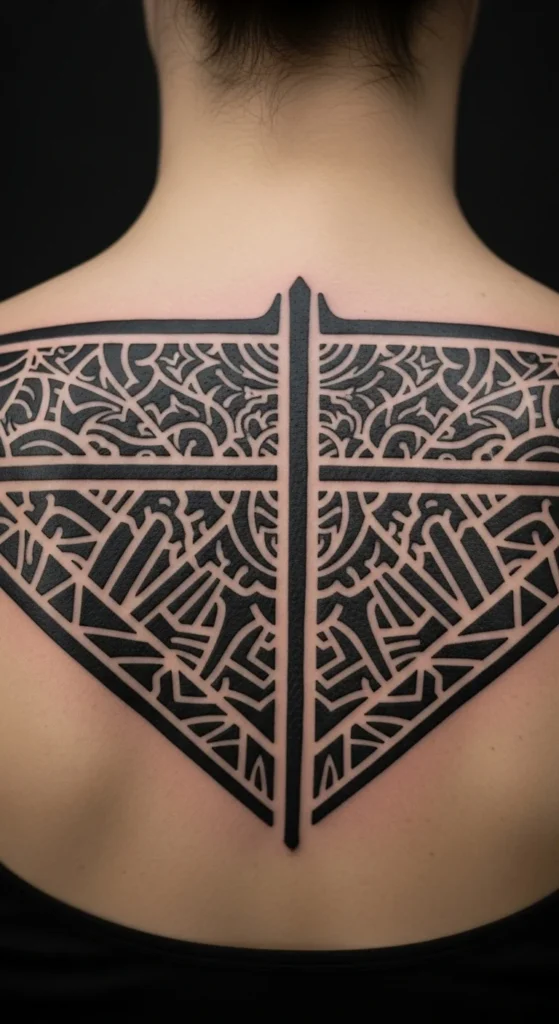
12. Geometric Spine Divider With Side Panels
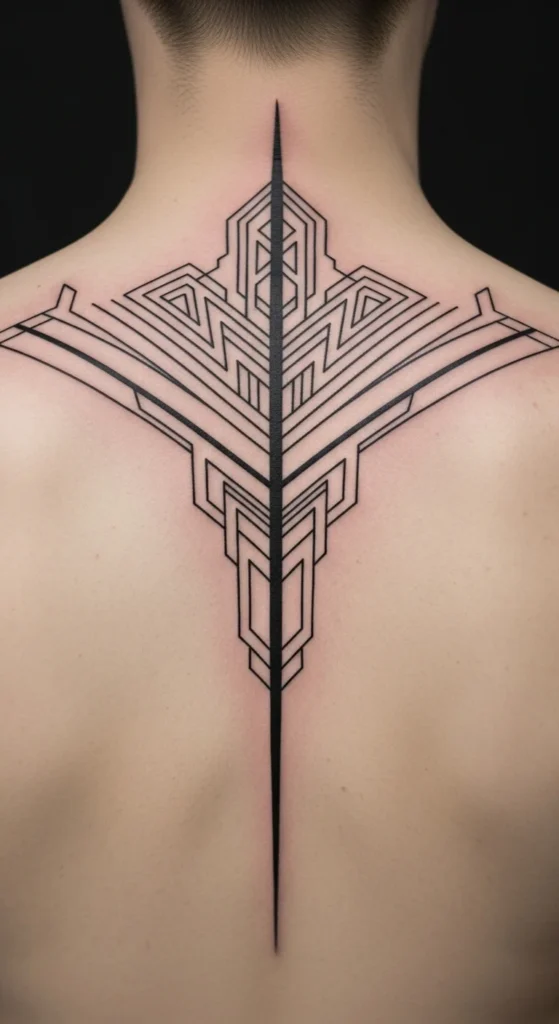
A geometric divider makes everything look structured. It’s great if you want symmetry.
Start with the center line. Add side panels later.
Keep lines thick enough to age well.
This style looks sharp even without shading.
13. Irezumi Dragon With Wind Bars
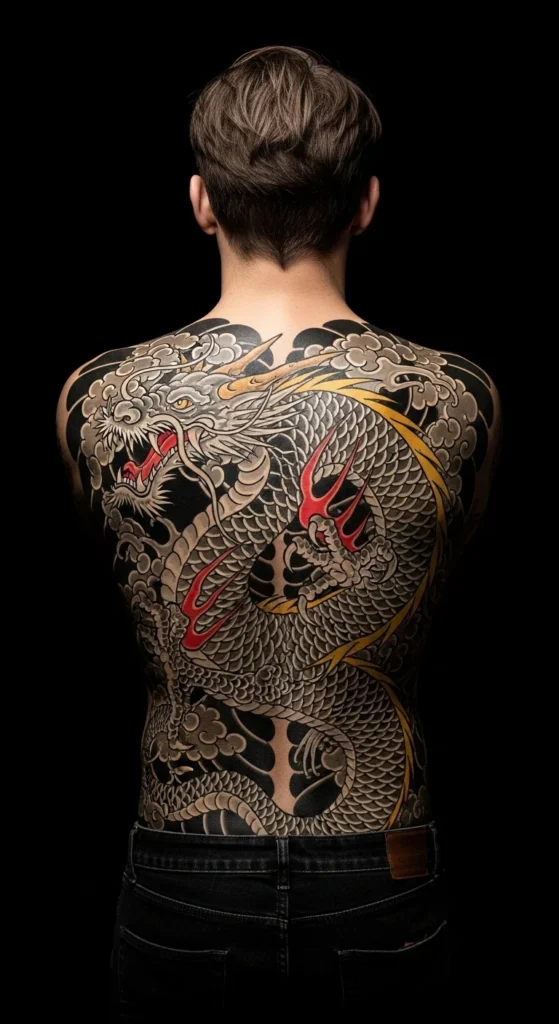
A Japanese dragon feels timeless and powerful. Wind bars and clouds help fill space without making it messy.
Start with the dragon head and upper body. Add the tail later.
Use bold outlines first. Shading can come later.
Budget tip: avoid full-color at first. Black-and-gray still looks strong.
14. Koi Fish With Waves (Japanese Flow)
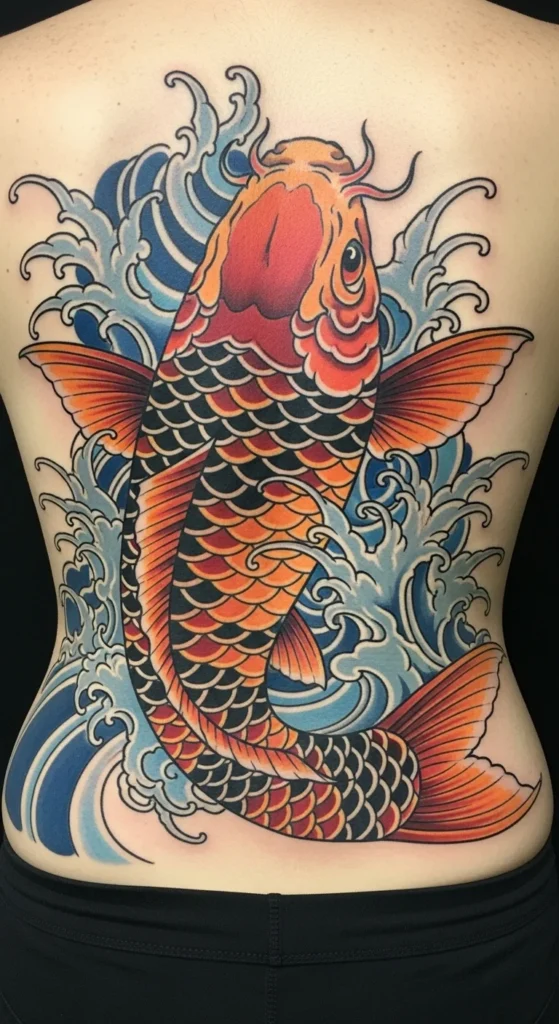
Koi designs look strong and classic. Waves add motion.
Start with one koi on one side. Add the second later for balance.
Keep wave details simple. Too many tiny lines add time.
This piece works well as a lower-back or mid-back build.
15. Rose and Dagger Upper Back
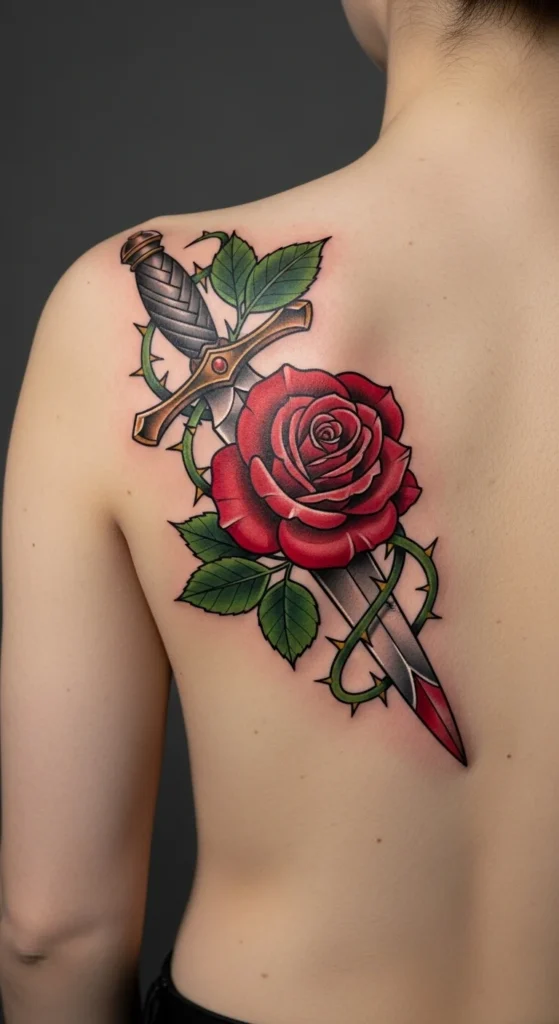
Rose and dagger is a clean symbol of contrast. It’s bold but not complicated.
Start with outlines only to reduce session time.
Add shading later.
Keep the rose petals simple and readable.
A diagonal placement adds motion and makes the back look wider.
16. Black-and-Gray Floral Garden Back
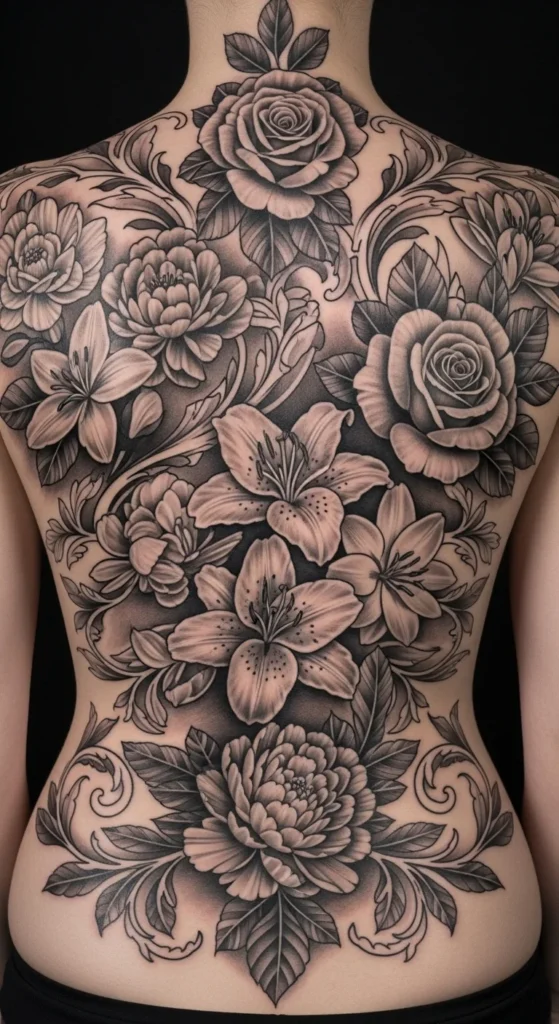
Florals can look powerful when they’re large and dark. Leaves and shadows create depth.
Start with one big flower cluster. Add more around it later.
Black-and-gray keeps cost lower than full color.
Use big leaf shapes instead of tiny filler leaves.
It looks bold, not soft, when contrast is strong.
17. Neo-Traditional Skull With Clock
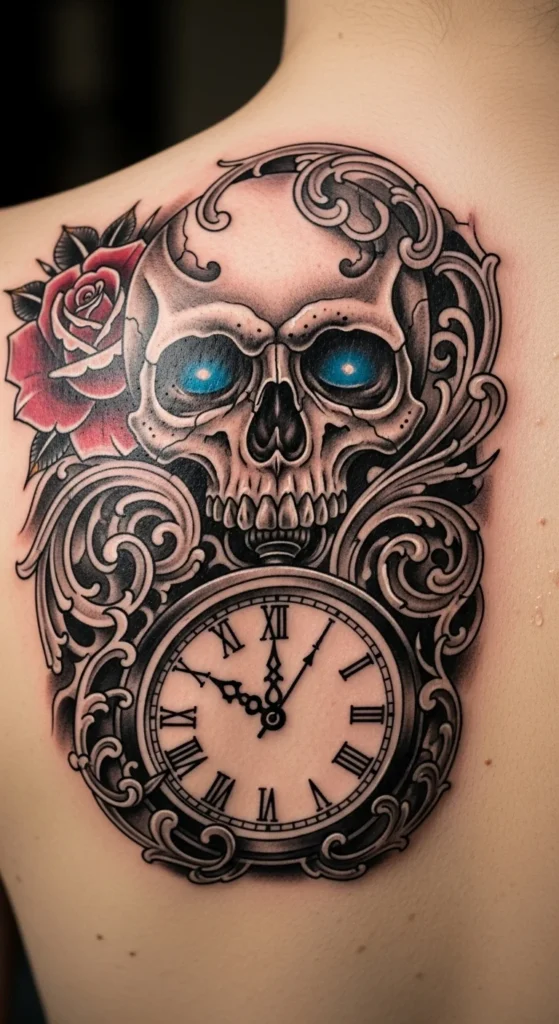
Skull plus clock hits the time theme without being cheesy.
Neo-traditional uses bold outlines, which age well.
Start with the skull. Add clock details later.
Avoid tiny numbers on the clock. They take time and can blur.
18. Shoulder Blade Crest Emblem
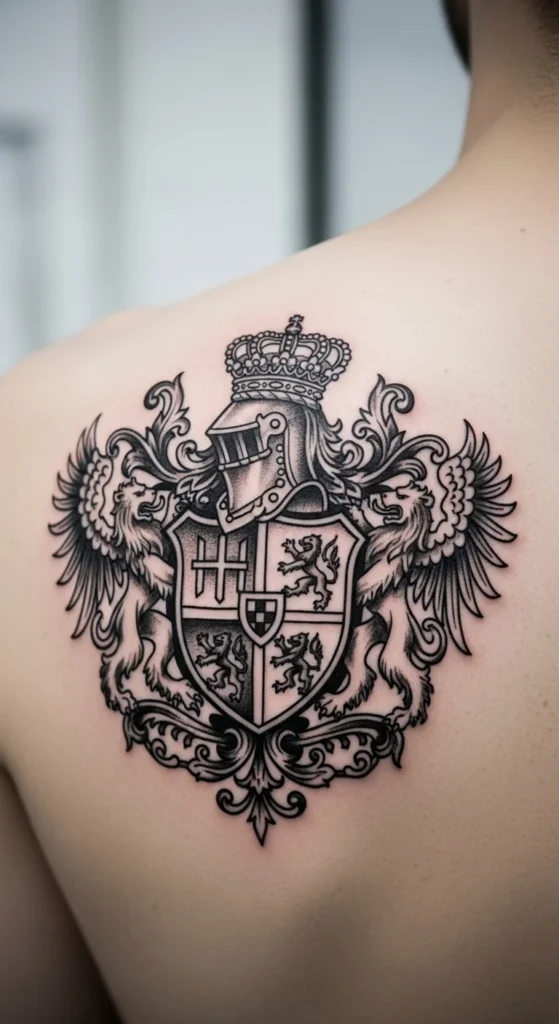
A crest on the shoulder blade looks sharp and clean.
It’s lower pain than spine work for most people.
Start small. Add banners or extra elements later.
This is good if you want something powerful but not huge.
19. Neck Base Edge Tattoo
A neck-base tattoo shows slightly with some shirts. It’s a controlled “peek” placement.
Keep it compact and bold.
Avoid tiny details.
Short session. Lower cost.
20. Shoulder Extensions to Widen the Frame
Designs that wrap the shoulders make you look wider.
Use thick shapes that sit on the deltoid edge.
Start with one side. Match later.
Good move for gym-focused physiques.
21. Asymmetrical Biomech Sweep
Asymmetry looks like motion. It feels modern.
Start at one shoulder blade and sweep down.
Keep the design “open” with negative space so it doesn’t look heavy.
Cheaper if you focus detail only in key areas.
22. Apex Predator Trio (Wolf, Lion, Bear)
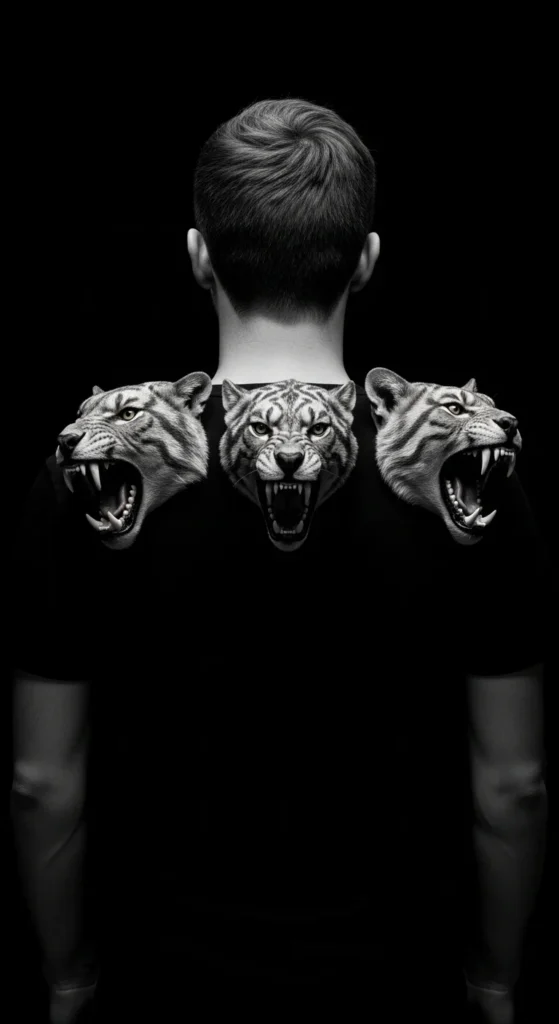
A trio layout is bold and wide.
Start with one animal center.
Add the other two later.
Stick to one style so the piece looks unified.
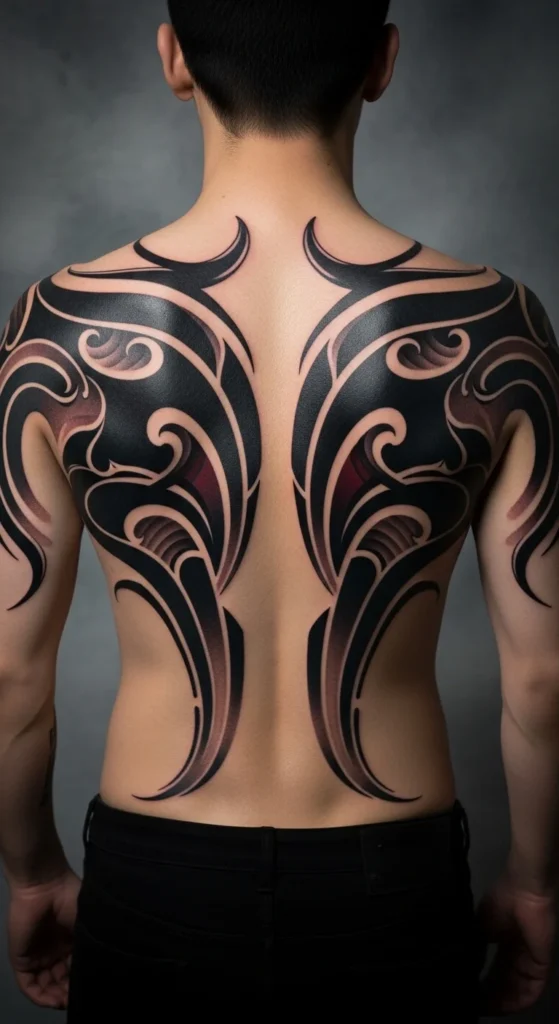
23. Heavy Blackwork Back Panel
Blackwork looks powerful and clean.
It’s usually faster than realism.
Strong contrast hides small flaws.
Plan the negative space carefully.
Great for a modern look.
24. Broken Chain Spine Tattoo
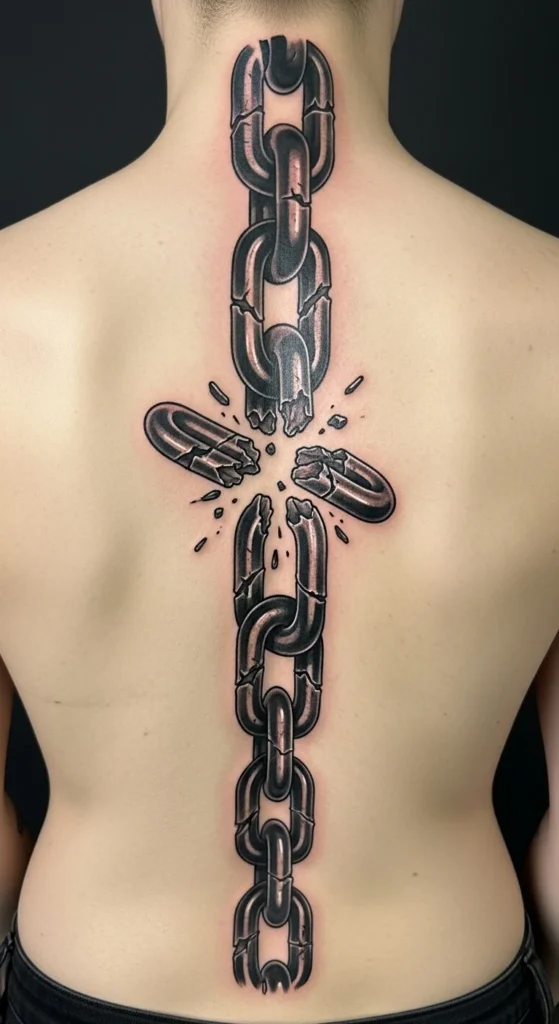
A broken chain symbolizes freedom.
Start with a short chain section.
Add links later.
Keep shading simple for budget control.
25. Armor Plate Backpiece

Armor plate designs look tough.
Start with the upper plates.
Add lower plates later.
Use big panels instead of tiny bolts.
It reads strong from far away.
26. Custom Storytelling Full-Back Collage
A collage lets you build a back piece over time.
Start with one main symbol.
Add smaller pieces around it.
Keep a consistent style so it stays cohesive.
Budget tip: schedule shorter sessions and build slowly.
DIY planning: write your top 5 themes on paper before you meet the artist. It helps you avoid random add-ons.
A back collage can grow with you for years.
Conclusion
A powerful back tattoo starts with smart placement and a design that works with your shoulders, lats, and spine. Pick one strong centerpiece, then build outward in stages to manage pain and cost. Keep details readable, use bold contrast, and bring clear references so your artist works faster. When you plan it step by step, you’ll end up with a back piece that looks intentional and hits hard every time you take your shirt off.